Thursday, 2 August 2012

How to: Cheetah Nails


Hey beautiful people! J Here is how I like to do my super trendy cheetah nails


So first of all you want to start off by choosing the colors you are going to be using for your nails you need: A base color (This can be anything to want like pink, blue, purple, green, etc), a print color (This color has to be a few shades darker than your base color and in the same color family, or you could go a bit cray and do another color family which I think would look super cool!), and then u need a black color and optional is some glitter nail polish.
1.       Paint your nails the base color, I recommend doing two coats
2.       Do little dots with the print color, Try to drag it a little bit on different directions so they don’t all look the same.
3.       Do the design on the nails with the black nail polish; try to make it vary as much as possible to make it look real.
4.        Put some glitter on those nails! I put it over the print color (if you want :P)

I really hope this helped some of u out there!
Ps: I did this on a piece of paper since I had just done my nails... and I was just too lazy to take it off and do my nails again... woops J
(I bought the product with my own money and this is completely my honest personal opinion, I am not being paid to mention this product)

Monday, 30 July 2012

Maybelline Color Tattoo by Eyestudio Bad to the Bronze (Review & Swatches)


So this Cream eye shadow has been talked about a lot during the last few months and I decided to give it a shot. This is my first cream eye shadow so sadly I don’t have much to compare this to. First of I bought mine in the color Bad to the Bronze. It has more frost than I expected by judging from the jar.


 I feel like it looks a tad bit muddy on my skin tone (tan) but using some gold-coppery eye shadow (like MAC’s All That Glitters) on top totally fixes that problem. 


It does last quite a bit like it is advertised but I do have some creasing around the crease but it does last on my lid so I would recommend using a primer under it. The cream is blendable but after a while it does dry and after that it is a bit hard to work with. I do over all like this product and think that the packaging is adorable. It is on the inexpensive side and I have heard is very comparable to pain pots so I would recommend you give this a shot if you’re looking for a long lasting cream shadow J I really hope this helped!

(I bought the product with my own money and this is completely my honest personal opinion, I am not being paid to mention this product)

Monday, 16 July 2012

Mac All That Glitters Eye shadow (Review & Swatch)


This well known eye shadow has been part of my every day look for about a year now. The coppery-gold colored eye shadow is one of my favourites and this is why:
-          It blends really easily! And its texture is really soft
-          It is a neutral color that looks good on all skin tones
-          It is pretty long lasting but I do recommend wearing a primer under it (like UDPP)
-          The shimmer is subtle and not overwhelming
-          It doesn’t give fallout


The only two cons I can really think of are the price that is a bit on the more expensive side and you can easily find dupes of this eye shadow by many brands. Maybe I’ll try to find some dupes for this J
I do overall recommend this because it is great quality but you could easily find a replacement. Hope this helped!


Other Mac product reviews: Mac MSF

(I bought this product with my own money and this is completely my honest personal opinion, I am not being paid to mention this product)

Sunday, 15 July 2012

(The Brush Series) Powder Brush: sigma F30 Review


To kick off my brush basics series I decided to start with the classic big powder brush. I use the sigma F30 for my everyday makeup with my MAC MSF natural and I will tell you why:


-          Its supper fluffy! So it cover a lot of the surface area of your face and therefore it makes the application of powder wayyy faster
-          It picks up the right amount and makes my powder not look cakey
-          It is easy to wash
-          It is easy to use this to blend the powder properly
Some of the cons:
-          It is the tad bit scratchy
-          Hard to carry about in your makeup bag because of the size
If you are looking for something maybe a bit softer you could always opt for a kabuki brush and size they don’t have a handle they would be easier to carry about J
I hope this helped!
** If you would like to know my thoughts about MAC MSFnatural it’s here J
(This product was given to me as a gift by family members and this is completely my honest personal opinion, I am not being paid to mention this product)

Saturday, 14 July 2012

MSF natural by MAC (Review and Swatch)


Msf natural by MAC made its way to my life in February of this year and I have been using it ever since. I am not the biggest fan or foundation during the summer because it just feels super duper heavy and just yukky so some concealer and Msf natural is all I need. It is not super pigmented but it does have enough pigmentation that with a few swipes it evens out my skin color.


 It doesn’t last more than a few hours (well at least for me, and I have oily skin) so you do have to reapply every so often. 


It gives your face a matte finish but doesn’t look to cakey if you don’t go too crazy with it. It is a bit on the pricey side but I do still think it is worth it. I do have sensitive skin and it doesn’t break me out so that is a plus J hope this helps

Oh and I use it in medium dark


(I bought this product with my own money and this is completely my honest personal opinion, I am not being paid to mention this product)

NARS blush in Mata Hari (mini review & swatch)


So I got this beauty yesterday at the mall in the color Mata Hari :)  I am soo exited.. It is my first NARS blush and so far it has not failed to amaze me. It had a really creamy texture and is easy to blend. The color shows up on my skin since it is super pigmented and mate (no shimmer), you really just need a tad for it to show up and because of this it is really buildable in case you are going for the more ‘overdone blush look’ that I find super cute! It is more on the pricey side but I think that it is worth it since it does last all day and I am pretty sure the blush itself will last me quite a while. I just can’t wait to get my hand in some of the other colors. I will do a bit of more in-depth review once I use it for a bit more. Hope this helped!


(I bought this product with my own money and this is completely my honest personal opinion, I am not being paid to mention this product)

Friday, 6 July 2012

Wet n Wild eye shadow trios (and swatches)


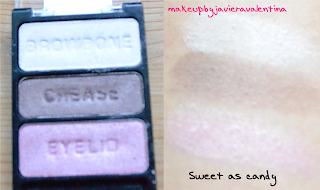
These drugstore eye shadows are affordable, come in a large range of color, and have a great formula. I have tried two colors; Don’t steal my thunder and Sweet as candy. Don’t steal my thunder comes with three very pigmented shadows, they are fairly smooth (not as smooth as Mac eye shadows) and easy to blend. You do get some fallout with the black and white eye shadow. I feel like the silver color is the best one out of this pallet. Sweet as candy comes with more natural eye shadows. Even though it is not as pigmented as Don’t steal my thunder it does have pretty decent pigmentation and does blend well into the eye. I do recommend them if you are looking for inexpensive eye shadows that have a decent payoff. I also recommend you wear a primer underneath them to make them last longer. Hope this helped!

(I bought these products with my own money and this is completely my honest personal opinion, I am not being paid to mention these products)

How to: Style a skirt


I’ve had a very committed relationship with skirts for the past two summers and I have found my three favourite ways to style them! I will be showing you the three looks with my favourite skirt of all times.


The first look is a plain v neck t-shirt tucked into the skirt. When choosing the t-shirt to wear with the skirt make sure the two colors don’t clash or that they aren’t too matchy-matchy. I paired this blue toned skirt with a dark grey top but I would usually go for a lighter grey v-neck (I just couldn’t find mine anywhere, woops). Accessories are a must when you are going to wear something on the simple side but you still want to look put-together. I am accessorising with a feather necklace with a red center to add a bit of color as well as two neutral bracelets, some sunglasses (make sure to always protect your eyes!), and white earrings. I would usually wear this with some black flats or sandals.


The second and third looks are using all the same accessories and just changing the top, you can do this to change the look from day to night without having to carry a lot of pieces around with you. The second look is using a white tank top tucked into the skirt. I think that this is the most elegant look from the three and you can get away with wearing to more formal occasions. You can also pair this with some black heals and be ready to go! The third look is the most casual of the three and by far the most edgy. I am using this t-shirt that I got at New York and that I cut off the neckline and the bottom to make it a crop top. You could remove some of the jewelry for this look and could easily pair it with some white converse for the more comfortable and rocker look.  Hope this helped! If I didn’t mention from where they are from it is because I have no clue where I got it J

(I bought all this items with my own money or where given as a gift to me by family members, this is completely my honest personal opinion, I am not being paid to mention these items) 

My makeup collection


here is my makeup collection :)  I know it is not that big but I’m working on it :P. If you want to know more about any product just let me know!


(I bought these products with my own money or they were gifted to me by friends and family members and this is completely my honest personal opinion, I am not being paid to mention these products)

Thursday, 5 July 2012

NYC in a New York color minute (Quick dry nail polish)


The polish most to the left is Matte Me Crazy, a mattifying topcoat (review), the one to its right is Greenwich Village, a matte true pink color, the one to its right is Spring Street, a matte orange-coral color, and the last one to the right is Moma, a  matte purple-plum color. I am completely in love with the formula of these nail polishes; they are creamy, opaque and of course dry super quickly! I have only used Spring Street, Greenwich Village and Matte me Crazy and I can truly recommend them. Another plus is that they are inexpensive and they do last a few days on your nails without chipping, especially if you put a topcoat over them. I apply two thin coats of the polish to get a completely opaque look, but you could totally get away with just one coat :). Hope this helped! 

(I bought the product with my own money and this is completely my honest personal opinion, I am not being paid to mention this product)

Matte Nail polish (NYC Matte Me Crazy)

( The picture on top is the before and the one on the bottom the after) 


Matte nails are gorgeous, there is no denying that but I was quite confused for a while on how to achieve the very glam look. It is way simpler than it seems! All it takes is a bottle of mattifying topcoat. The only one I have tried is the NYC Matte Me Crazy (Gotta love that name :P) and I absolutely love it! I apply my nail polish as normal and just apply one coat of the topcoat and it makes the nail polish matte in just a few seconds. I would totally recommend this to anyone. Another plus of the topcoat is that it does make my nail polish last quite a while. Hope this helped! 

(I bought the product with my own money and this is completely my honest personal opinion, I am not being paid to mention this product)  


Wednesday, 4 July 2012

Fourth of July


Here it is :D This flas took me about 2 1/2 but I am kind of happy with how it turned out :) So it was worth the work